Cheyenne Garden Gossip

Gardening on the high plains of southeastern Wyoming


Winter sowing magic

Translucent plastic jugs planted with seeds can be left outside for the winter. Seeds are protected from wind and critters and will sprout in spring. Photo by Barb Gorges.

Winter sowing magically protects and sprouts seeds outdoors

Published February 9, 2024, in the Wyoming Tribune Eagle.

By Barb Gorges

            Winter sowing is a fun technique I originally learned from Laramie County Master Gardener Michelle Bohanan in 2016.

            It’s now so popular that an internet search brings 149,000 results.

            Winter sowing imitates nature by leaving seeds outdoors over the winter. Sowing seeds in a container with a clear or translucent cover protects them from wind and critters but exposes them to snow and cold. Some kinds of seeds need to freeze and thaw to sprout.

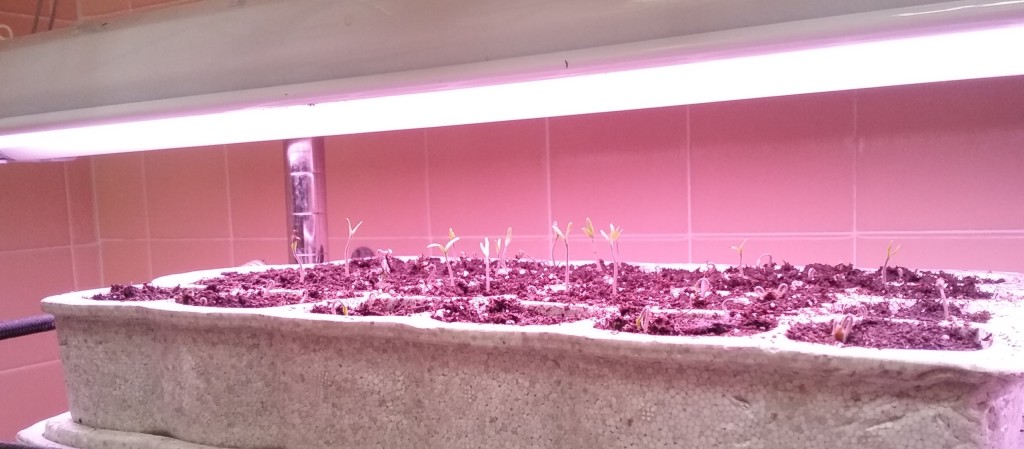
            The seeds sprout starting late April in Cheyenne. They can be transplanted directly into the garden (usually late May) without having to gradually harden them off the way indoor grown seedlings need to be.

Seeds

            I use the technique primarily for native perennials, but it can be used for other perennials, annuals, and cold happy vegetables (cabbage, kale, etc.). Tomatoes, eggplants and other heat happy vegetables, not so much—it would give them too late a start to have ripe fruit before our first fall frost.

            My native seed choices for beginners include:

–Narrowleaf Coneflower (purple coneflower’s Wyoming sister)

–Mexican Hat, also called Prairie Coneflower

–Blanket Flower, also called Gaillardia

–Black-eyed Susan, also called Rudbeckia

–Rocky Mountain Penstemon

–Beebalm, also called Monarda

–Showy Milkweed (most common milkweed in southeast Wyoming)

–Columbine

            Look for these at the Laramie County Library’s Seed Library or from companies that specialize in prairie plants like Prairie Moon Nursery, Prairie Nursery, and High Country Gardens.

            For more inspiration, see the Habitat Hero information at https://cheyenneaudubon.org/habitat-hero-resources/.

Timing

            I aim to get seeds sown in January and February, when it’s finally cold enough, yet there is still enough cold weather for seeds that might need eight weeks of cold (stratification) to break dormancy.

Jugs

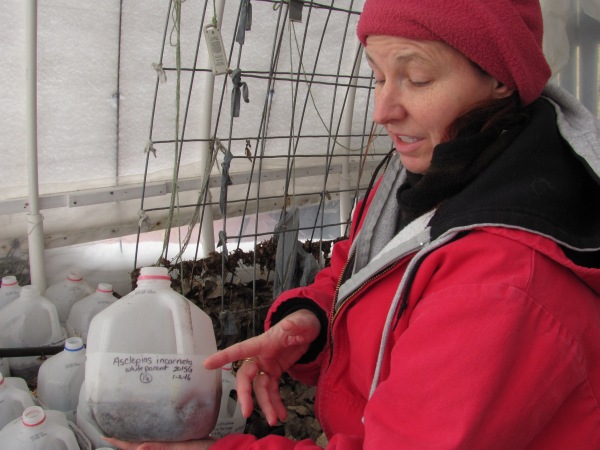
            Michelle’s and my containers of choice are the 1-gallon pliable, translucent water, juice or milk jugs because they are deep and roomy, and even if you don’t buy those beverages, you probably know people who do.

            My problem is that our family’s preferred brand of milk now comes in white containers. Because I donate jugs of seedlings to the Master Gardener spring plant sale, I’ve learned to hang onto the old translucent lids and reuse them with new white bottoms. If you store jugs in the dark the rest of the year, they will last for years.

Jug prep

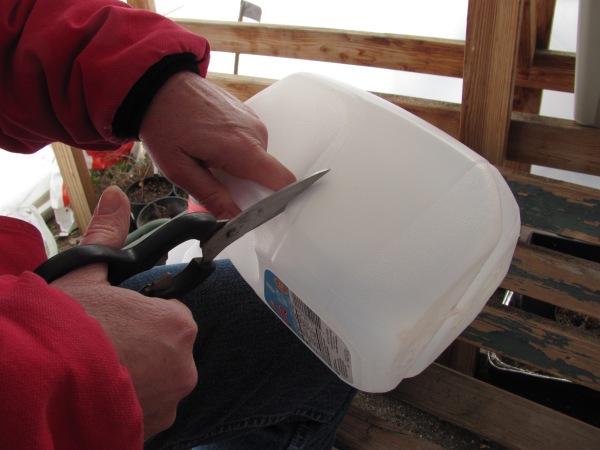
            Plastic jugs are so flimsy these days that my pointy kitchen shears are sharp enough to make a hole level with the bottom of the handle and then I can cut all the way around. I also poke four holes in the bottom for drainage.

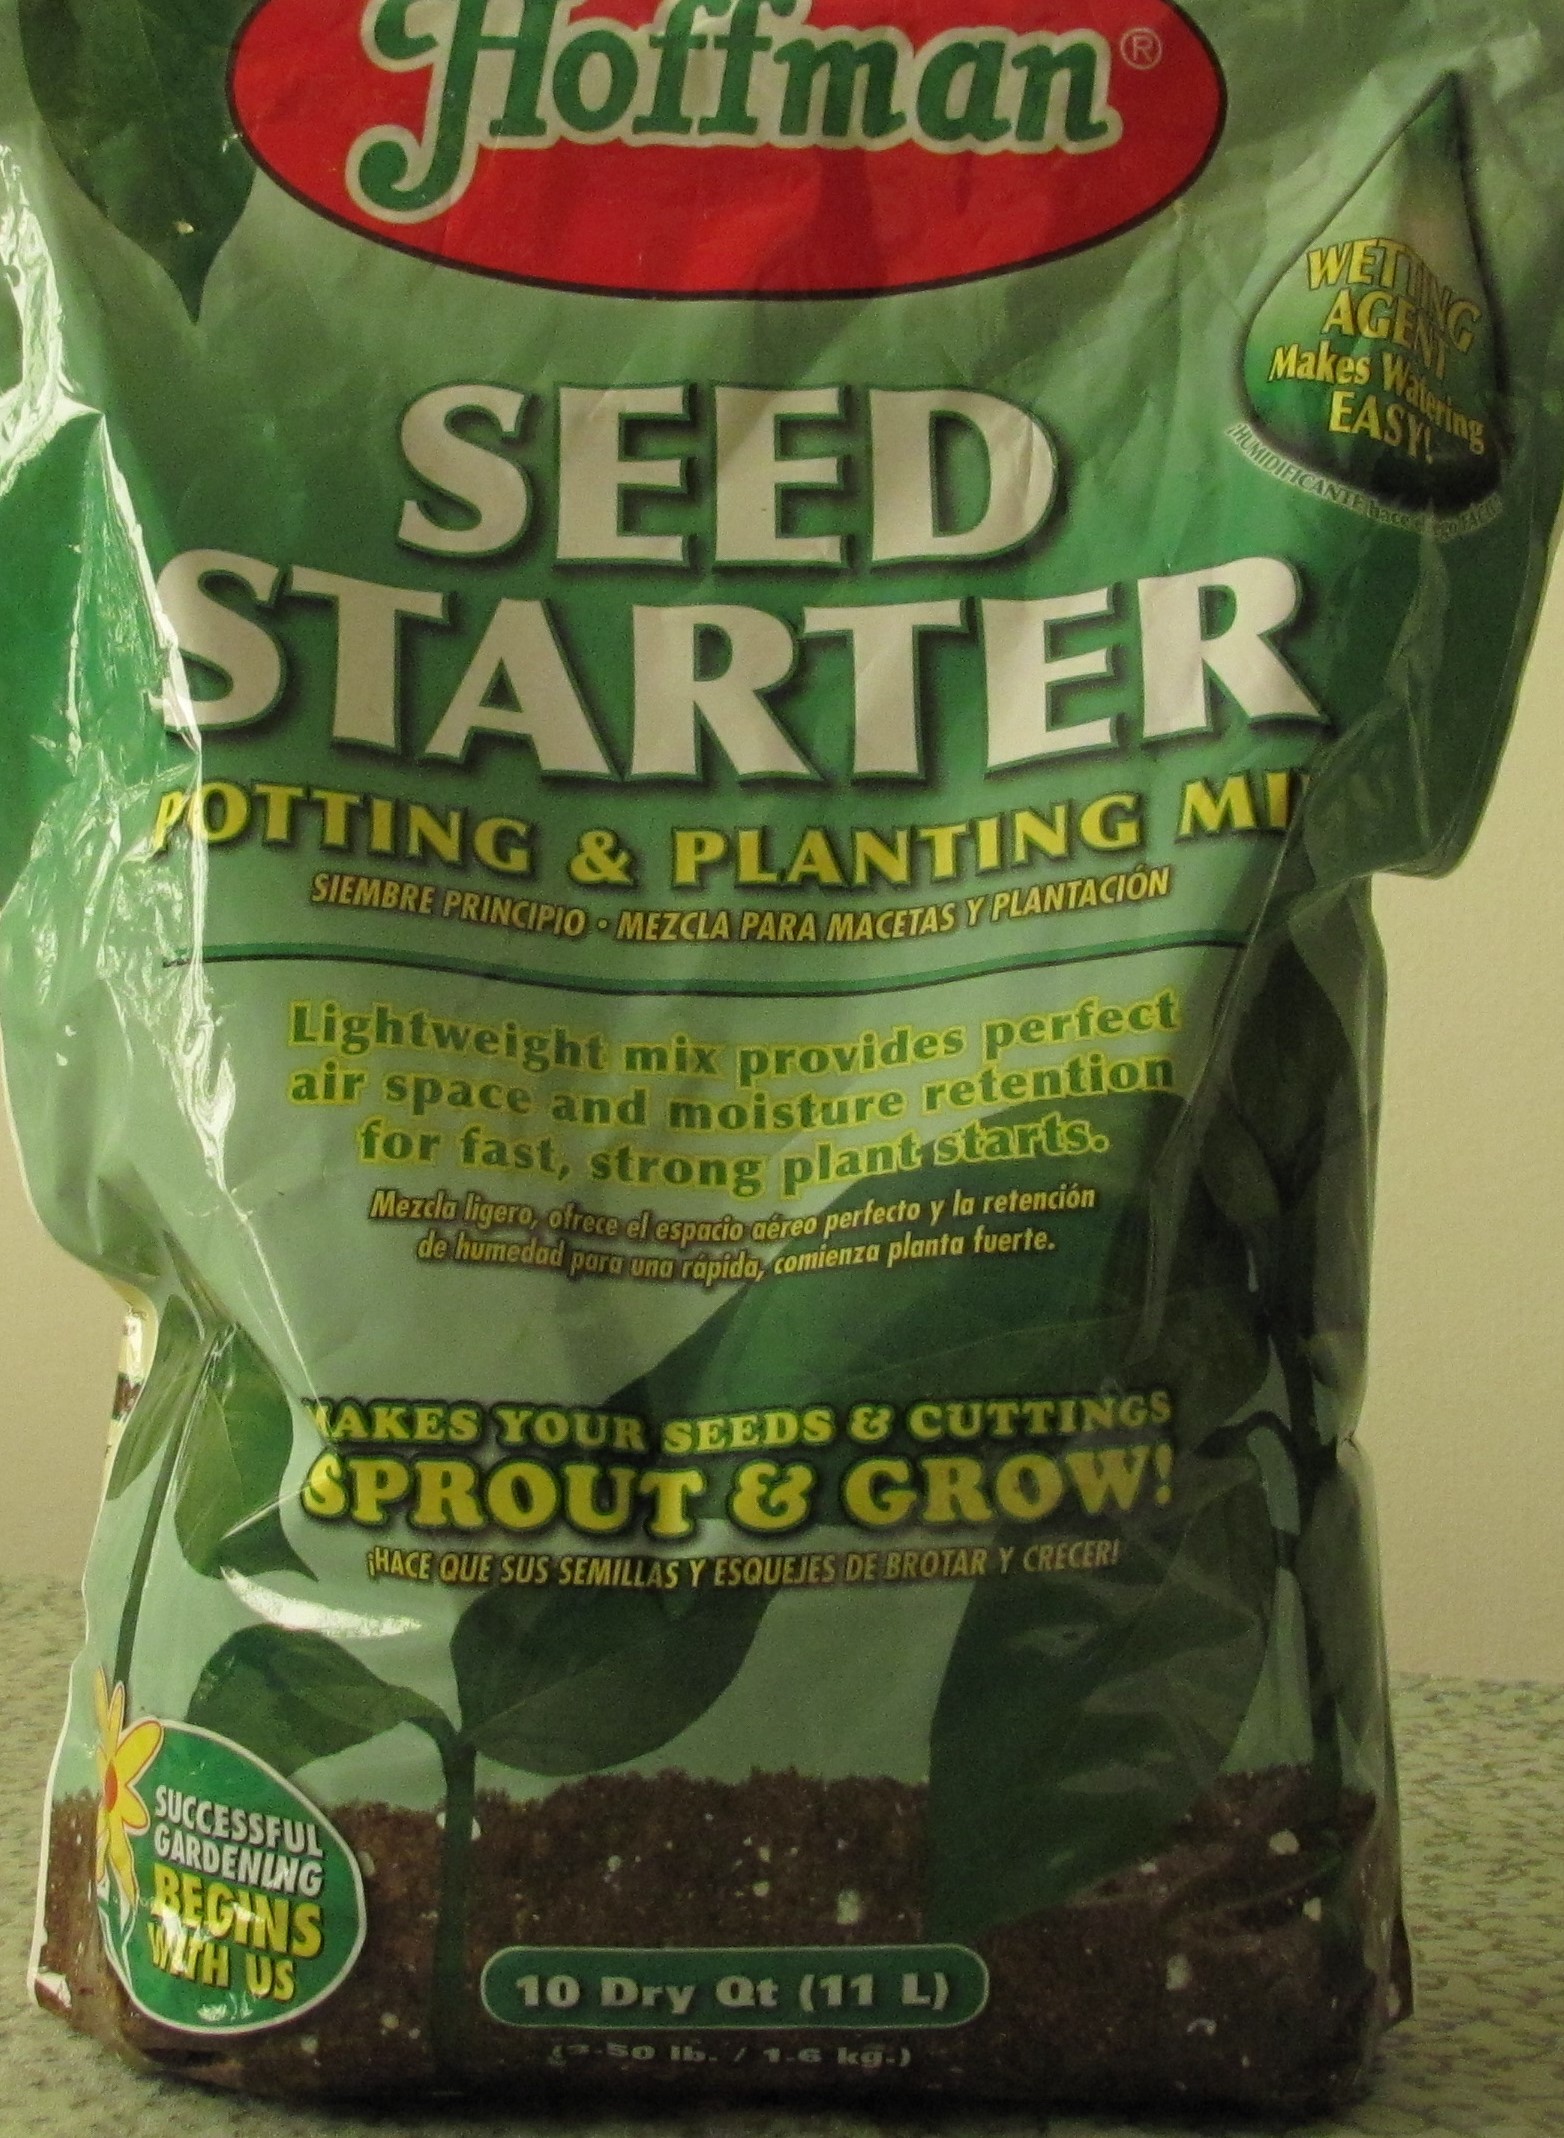
            Run-of-the-mill, peat-based potting soil works for me, though I should think about trying something more ecologically friendly.

            Peat can be dry and very hydrophobic so I dump a bunch in a large tub, water it well, mix it and let it sit for a bit to get it wet evenly. Then I scoop it into the bottom of each jug 3 inches deep.

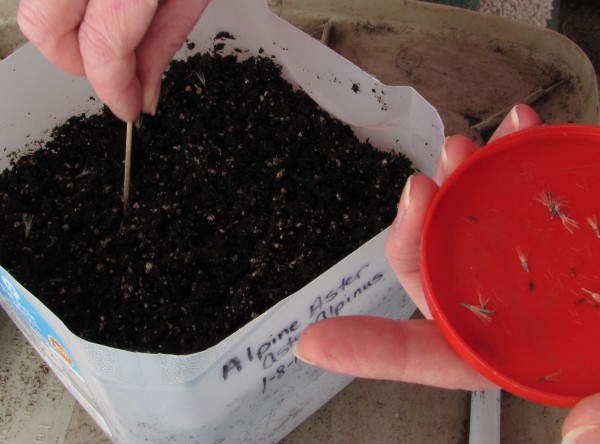
            I use a Sharpie permanent ink pen to write the seed names on the sides of the jug bottoms.

Seed planting

            Michelle counts out her seeds, planting them in grids of 4 x 4 or 5 x 5 per jug. Me, I tend to just scatter seeds. Once, I ended up with 200 in one jug. When crowded, seeds sprout but then don’t grow much, except for their roots, so they need transplanting much sooner.

            Some seeds, usually the tiny ones, need light to germinate so just sprinkling them and pressing them against the soil is good enough. Plant 1/8th inch and larger seeds 1/8th inch deep. Check seed packets or the internet for more specific information.

            After planting, force the top of the jug into the bottom. It’s Ok if the sides buckle. Remove the jug’s lid—more access for snow to get in.
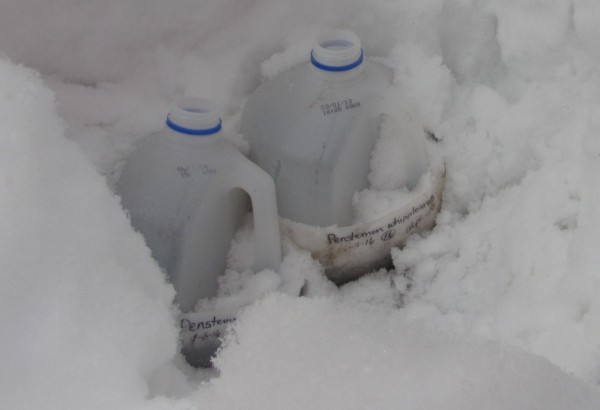
Jug placement

            Find a safe, semi-shady spot where snow likes to drift. If you have only a sunny spot, you may have to water periodically. After sprouting, move jugs to a sunny location and remove the tops of the jugs on nice days.

Removing seedlings

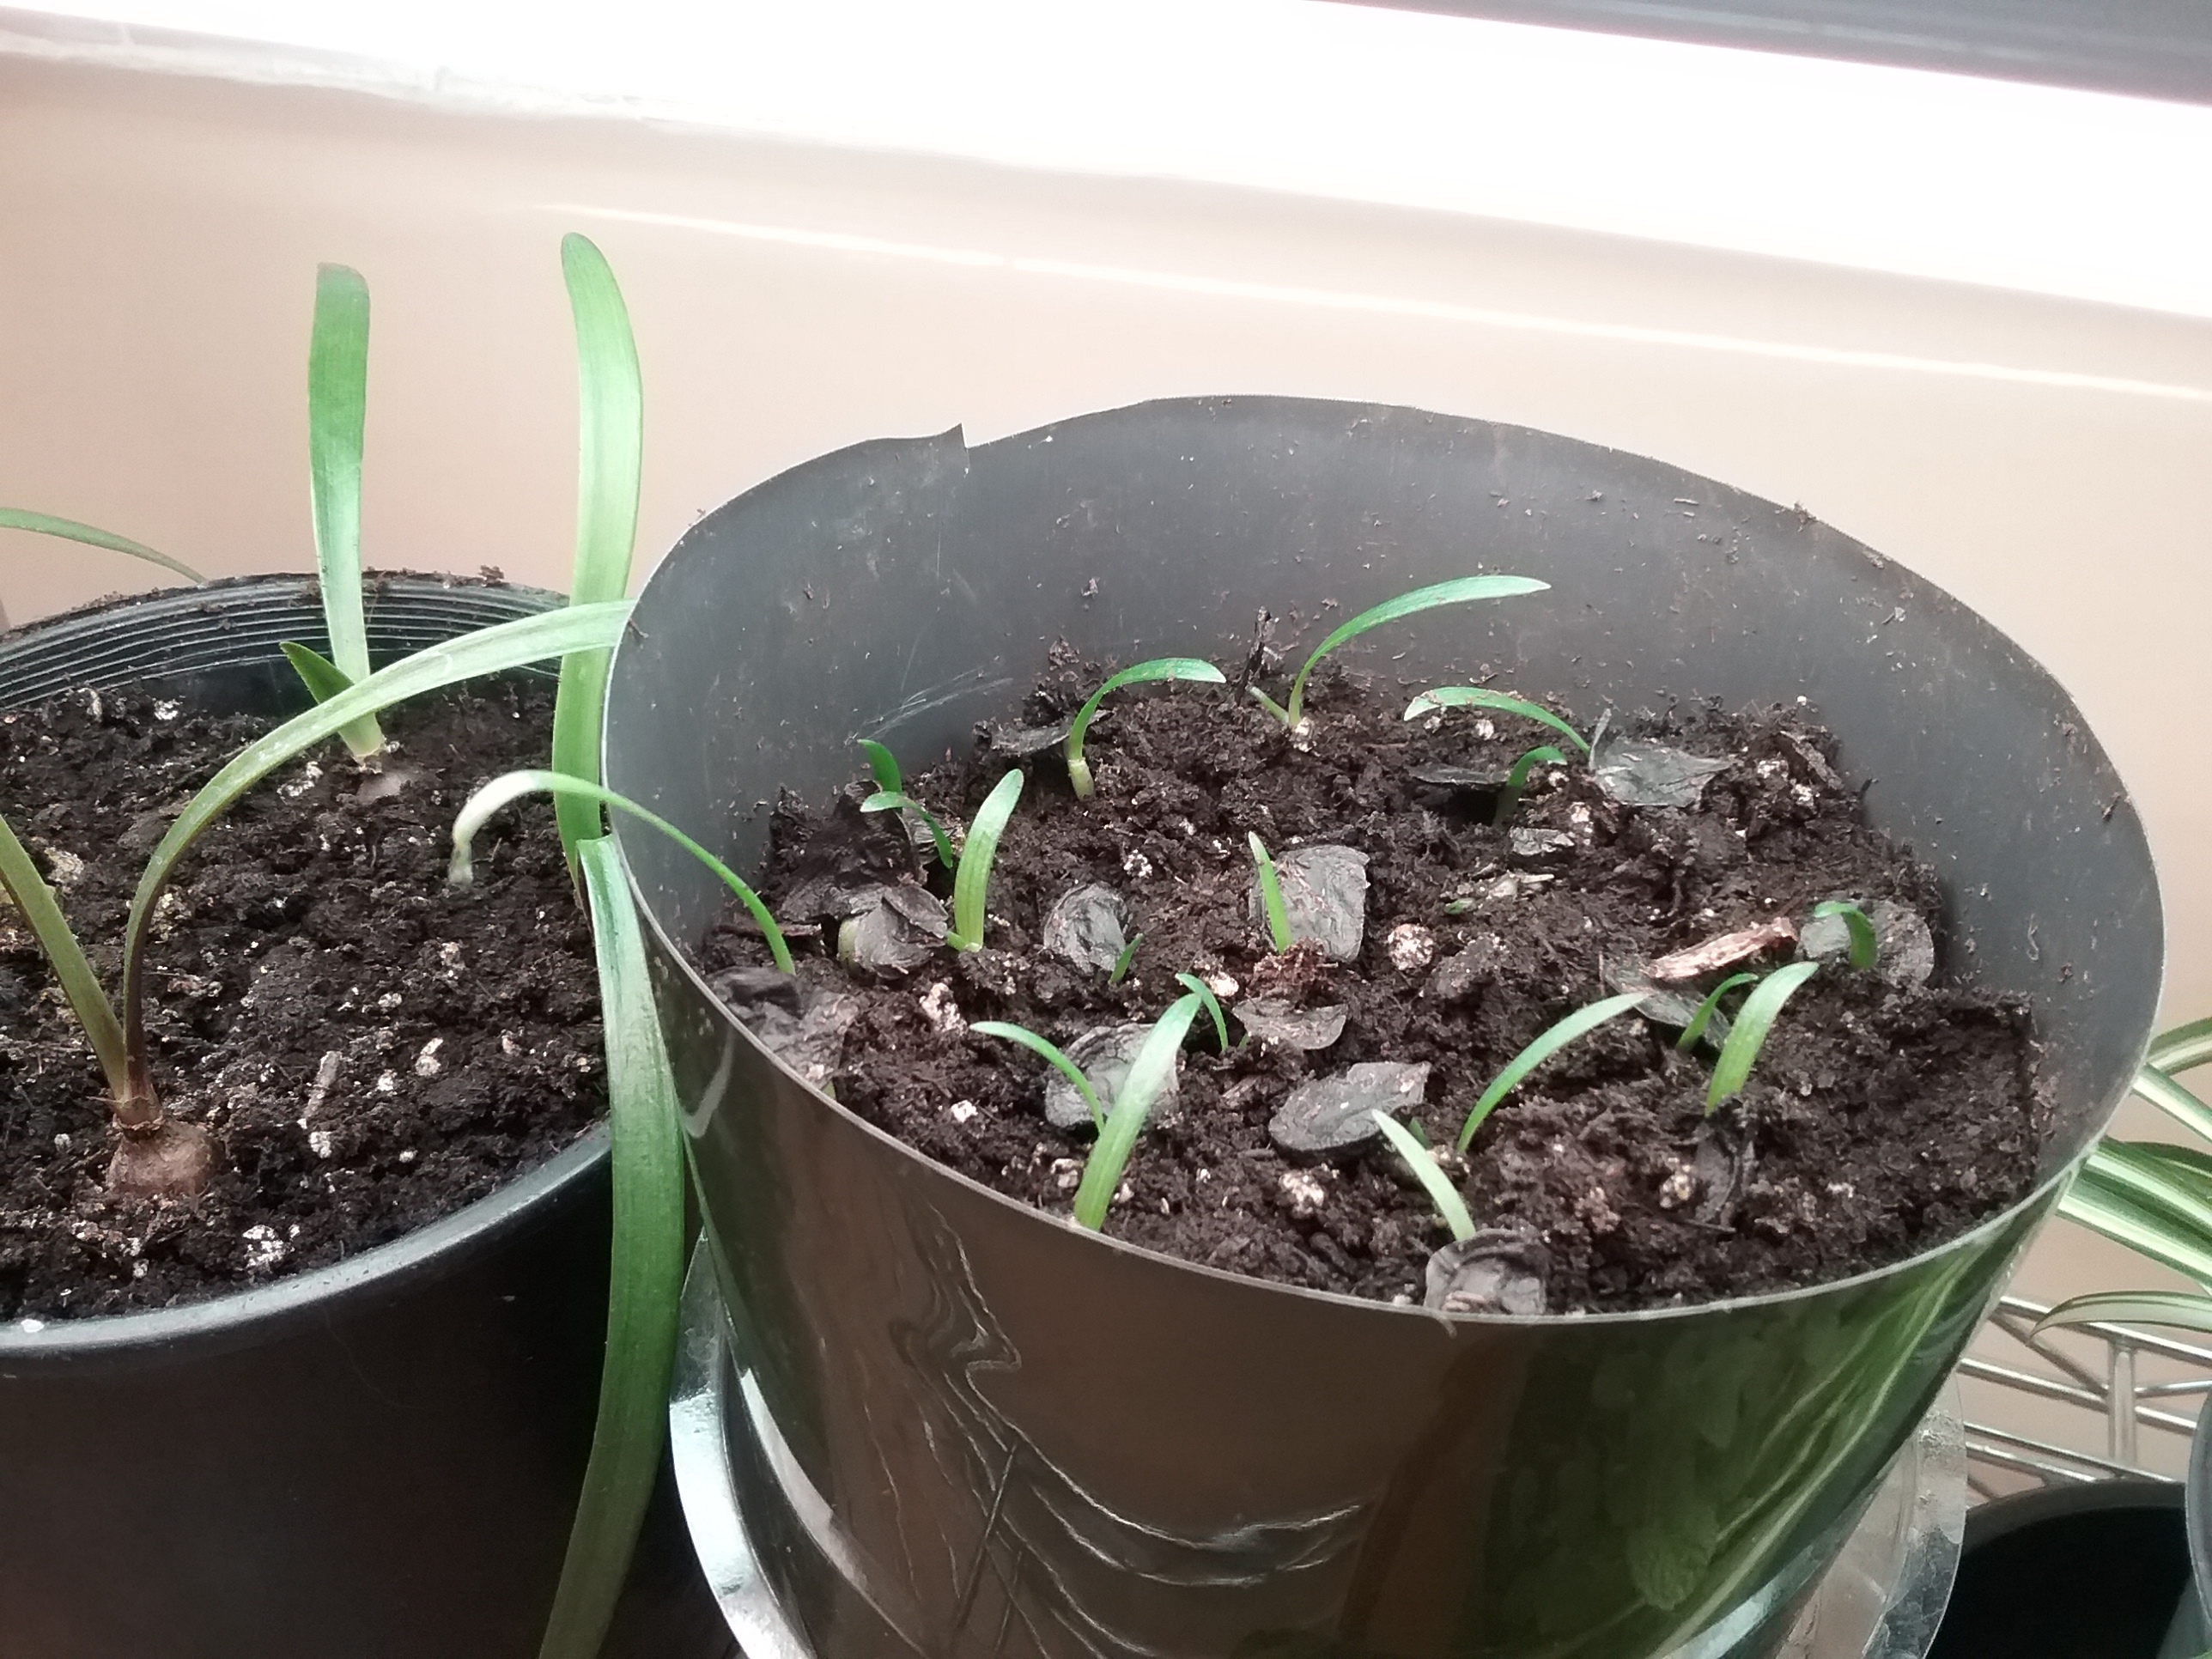
            Good root growth holds the soil together in a jug like a giant peat brownie.

            Remove the top of the jug, stretch your fingers across and through the seedlings. Then tip over the container gently to let the brownie drop out onto your hand.

            Gently break the brownie apart, teasing out the individual seedlings for planting directly into the garden or into pots with more room. Be sure to gently shake off most of the potting soil before transplanting a seedling into the garden.


Spring gardening starts indoors

A yogurt container stuffed with species tulip bulbs, Tulipa linifolia, forced to bloom early indoors, provides a welcome splash of winter color. Photo by Barb Gorges.

Spring gardening starts indoors: bulb forcing and vegetable seedlings

Published in the Wyoming Tribune Eagle Mar. 5, 2022.

By Barb Gorges

            March is the time of year to ignore garden news from balmier parts of the country, especially Facebook posts with greening landscapes with bright flowers and ripening vegetables. But there is plenty going on here—indoors.

Bulb forcing experiment

            The flowers I see on my windowsill late winter are usually phalaenopsis orchids and amaryllis.

            This year, I also have bulbs I’m forcing—the ones I couldn’t find time to plant last fall, threw in the fridge in early November and took out and potted in late January. After they bloom indoors, I will plant them outside, when the soil thaws.

            These weren’t bulbs typically recommended for forcing, like hyacinth. Now I see why. Iris reticulata, the rock garden iris, put up tall spikey, grassy leaves (that our cats chewed a bit before I put them out of reach), with the blooms hiding in the leaves. In the garden, the flower stems would be short and the leaves shorter. I blame the low-e glass in our windows for the missing wavelengths affecting growth.

            The species tulips, delicate little things from which typical tulips are descended, got leggy, too. But at least the flowers were above the leaves. They started blooming at the very end of February, adding a touch of hope to those below-zero days.

            Siberian squill also grew leggy—and then fell over, its little blue flowers never opening quite like they do in the patch I have in the backyard, which blooms in late April.

This is our seed starter from Lee Valley Tools. Pour water in the reservoir and wicking (hidden) delivers it to the open bottoms of the planting cells. That and the plastic dome keeps the soil moist. When seedlings emerge, we remove the dome. When the seedlings have one set of true leaves we transplant them in 2.5-inch plastic pots we’ve saved from nursery purchases. We may up pot one more time before plants are ready for the garden in late May. Photo by Barb Gorges.

Vegetables and other annuals

            March is time for planning your summer garden.

            Thinking about growing vegetables and annual flowers? If you don’t want to dig up lawn and or weeds, consider containers. A tomato plant will need at least a 5-gallon bucket with plentiful drainage holes. Fill it half with potting soil and half with compost. Squeeze in a few flowers in larger containers.

Raised beds can be built on top of existing lawn or weeds. To suppress aggressive weeds before filling it with weed-free garden dirt and compost, you might want to put down a layer of cardboard first.  But if it’s a shallow raised bed, sides less than 18 inches, the cardboard might cramp the vegetable roots.

            One advantage to container gardening is that you can change the location if you discover your tomato plant isn’t getting at least 6 hours of sun, is getting too hot mid-afternoon, is farther than you want to drag a hose, is in too much wind, or is too far from the house.

            Unless you have a hoop house (affordable substitute for a greenhouse), pick short season vegetable varieties suited to our short growing season. Seed packets will show “days to maturity” so look for vegetables that will give you edibles in under 90 days. The count starts when you transplant a seedling after the average last day of frost, May 25. The date of our average first frost is September 20. A 55-day tomato will give you fruit by the end of July or beginning of August.

            When figuring out when to start seeds indoors, count back from May 25 and allow about 6-8 weeks or whatever the seed package says.

            Some of the best tomatoes for our area will be available as transplants at the Laramie County Master Gardeners plant sale May 14 at the Event Center at Archer but wait to safely plant them.

            Whenever you “up pot” or transplant almost any plant—annuals, perennials, shrubs, trees—the latest advice is to gently remove as much old soil from the roots first so that the plant will establish faster in its new location.

            Forget starting plants in peat pots. You are supposed to be able to pop the whole pot and plant into the garden but here in Cheyenne, you will discover by fall few roots ever penetrated the peat barrier.

            Start thinking about how you will protect your veggies from hail. If you are growing intensively in a container or raised bed, you can knock together a hail guard. It looks like a card table that stands taller than the plants, but the playing surface is hardware cloth, a rough wire mesh.

            To be a successful vegetable grower, make a commitment to check your plants every day. Catching pest and disease problems early means you have time to get horticultural advice from the Laramie County Extension office or the Cheyenne Botanic Gardens.

            Every day, pick out the tiny weeds. You’ll hardly disturb the soil and all the hardworking microorganisms in it. Cut large annual weeds off at the soil surface instead of pulling them. A couple inches of mulch keeps most weeds from sprouting and keeps the soil moist longer.

            Gardening can contribute to mental health, but only if you spend time in the garden with your plants.

Iris reticulata, also known as rock garden iris, is another small spring-blooming bulb that can be forced to bloom indoors in winter. Plant the bulbs outside in early summer and they could rebloom next spring, if not the year after that. Photo by Barb Gorges.


Seed-starting lights

2020-03 lights-seeedlings

Mark started tomato seedlings under a fluorescent shop light a week before this photo was taken. We have utility shelves set up in the unused bathtub in the hall bathroom. The rest of the year the shelves are filled with houseplants that do well with only light from the bathroom’s skylight.

Published Mar. 15, 2020, in the Wyoming Tribune Eagle, “Better lighting means stronger seedlings”

By Barb Gorges

When hours of daylight are quickly lengthening and seed packets are showing up at garden centers, you know it’s time for flower and vegetable seed starting. If you’ve never tried, it’s time to learn how.

You can go to my archived columns at https://cheyennegardengossip.wordpress.com/ and search “seed starting.” You’ll learn how starting from seed saves you money and gives you options for tomatoes and other vegetables adapted to Cheyenne. Get tips on selecting seeds, potting soil and pots. Learn how to time planting, how deep to plant seeds, how and how much to water and how to avoid damping off. Then learn how to harden off seedlings before transplanting them.

This year I want to talk about light. The right light will give you nice, stocky green plants instead of spindly, sickly ones.

There’s a misconception that windowsills work great for starting vegetable seeds. After all, millions of houseplants can’t be wrong. But houseplant origins are typically the shady understory of tropical forests. Vegetables prefer full sun. Also, many windows are now treated to improve energy efficiency (lowering heat transference) by blocking parts of the spectrum. Greenhouses work better than windows because they give plants direct light from more directions for more hours per day.

Without a greenhouse—glass or hoop house—we’re talking supplemental lighting. On a recent trip to my nearest big box store I found all kinds of grow light bulbs that will fit in a lamp but are not adequate for more than a couple pots. The store also had ordinary 4-foot-long fluorescent shop lights which fit perfectly over two flats of seedlings and will produce decent growth, whether you find full-spectrum bulbs or special grow light bulbs.

But LED lights are taking over. At the same big box store, I found 4-foot LED shop lights. The bulbs are integrated with the fixture and come in a variety of brightnesses, 3,200 to 10,000 lumens, with a range of prices to match, $15 to $75.

There are also LED bulbs, both regular and grow lights, that will replace the bulbs in your T8 or T12 fluorescent fixtures, but they won’t be quite as energy efficient as the integrated ones.

You’ll notice LED bulbs can be about four times more expensive than normal fluorescents, but they cost less than half as much to run and are supposed to last longer.

Then there are the industrial LED grow lights that emphasize blue and red lighting—the important part of the spectrum for growing plants. They come with industrial prices as well. Choosing one gets quite technical. Check out the Colorado cannabis grow suppliers for advice.

However, the few weeks of light our tomato seedlings need hardly justifies industrial lighting.

Light set-up

Because you want to keep the light about a couple inches above the tops of the seedlings, you need to be able to adjust the distance as they grow. Too close and seedlings dry out. Too far and they get spindly. Hang the shop light using the chains that come with it, shortening as needed. Joe Lamp’l, host of PBS’s Growing a Greener World, suggests using ratchet pulleys instead.

Or, rather than move the light, you can stack boxes under the flats to bring them up to the light and remove the boxes to adjust the distance as the plants grow.

How do you hang the shop light? You can hang it from the ceiling over a table, especially somewhere like an unfinished basement room.

A set of adjustable utility shelves works well if there is a way you can attach your light fixtures to the underside of the shelves and adjust them. Keep in mind the distance between shelves must accommodate seedling height at six or eight weeks plus a couple inches of space and the light fixture thickness.

Mark and I put freestanding utility shelves in our unused bathtub. For the top shelf we put an expandable shower curtain rod over it and hang the shop light from it.

Plugging it in

Some shop lights can be strung together. Otherwise, if you have multiple lights, you are looking at a power strip, giving you a handy way to flip them off at once. Or, plug the power strip into a timer. Lamp’l’s latest home research shows 16 hours of light per day is about right—seedlings need to sleep too.

Additional tip

Mark and I use electric heat mats under the flats and clear plastic domes or plastic wrap over them to keep the moisture in. But at the first sign of seed germination, they should both be removed.


5 Comments

Amaryllis reblooming & propagation

2017-12amaryllis red Barb Gorges

Amaryllis is a popular flower at Christmas time, but without forcing, it prefers to bloom in spring. Photo by Barb Gorges.

Published Dec. 17, 2017, in the Wyoming Tribune Eagle, “Amaryllis beyond the holidays: reblooming and propagation.”

By Barb Gorges

In the pantheon of Christmas season flowering plants, I’ll take the elegant amaryllis and its big blossoms any day. Oh wait, I don’t have any more room on my windowsill.

What started as two amaryllis gifts 10 years ago has become numerous “daughters” and seedlings.

The amaryllis you see listed in catalogs and for sale at garden centers, florists and grocery stores during the holidays are intended to be disposable. But it really isn’t difficult to get them to bloom again, though there is a trick to get them to perform next Christmas. Growing them from seed you collect yourself takes only patience.

Beware

Beware of amaryllis bulbs encased in colorful wax decorated with glitter. They flower without any need for dirt or water because the bulbs are large and contain nutrients needed for blooming. Just set them on a saucer. But it seems to me cruel and unusual punishment to bind a bulb in wax and let it die after flowering.

Beware the decorative pot that may come with your bulb. It doesn’t have a drainage hole. No fuss, no muss. But if you want to keep your holiday amaryllis from year to year, replant it in a pot with a drainage hole. The proper pot size leaves about an inch between the side of the bulb and the side of the pot. Plant the bulb so that nearly half of it is above the soil.

Watering and fertilizing

Without a drainage hole, you are never sure if you have given a plant enough water or if there’s a big underground puddle rotting the roots. It’s best to water a potted plant a bit at a time until water emerges through the drainage hole and then dump the excess water.

Watering amaryllis once a week works in the winter climate of our Cheyenne house which has 20-40 percent humidity, is at 64 degrees Fahrenheit during the daytime and cooler at night. The peat-based potting soil holds water well enough, but I allow the top inch of soil to dry out. Little black fungus gnats mean I’m watering too much.

I fertilize my amaryllis maybe at 25 percent or less of what is recommended on houseplant fertilizer packages. My friend Jane Dorn has an enormous pot of enormous bulbs that bloom two to three times a year and she only fertilizes once a year.

Dormancy for forcing or wintering

If you want to force your amaryllis to bloom for Christmas next year, treat it as a houseplant over the summer. In early September, unearth it carefully, wash off the dirt, trim the roots to 1-2 inches long and trim the leaves 1-2 inches above the neck.

You Tube’s Amaryllis Man Charlie Johnston says to let the bulbs dry for three weeks before refrigerating them for 6 weeks. You can also do this if you don’t have room indoors in the winter for a lot of big floppy-leaved plants.

Take the bulbs out 5-6 weeks before you want them to bloom and repot them. Bulbs are in this condition when you buy them for holiday blooming.

Reblooming naturally

I don’t let my amaryllis go dormant. The first year I had one, I decided to keep watering it year-round and it bloomed again in spring following the next Christmas.

I put my amaryllis plants out for the summer on our covered patio. The roof is translucent plastic, shady by afternoon. It also protects plants from hail and hard rain. I put the plants back inside a sunny window in September and wait.

Looking at my records, flowering begins anytime between the end of February and early April and lasts for a month. My two varieties don’t bloom at the same time as each other.

2017-12amaryllis w daughters blooming--Barb Gorges

This pot of pink amaryllis has a mother bulb, two blooming daughter bulbs on either side, and a couple baby bulbs sending up their first leaves. Photo by Barb Gorges.

Mothers and daughters

If you keep your amaryllis from year to year, you may discover your bulb gets bigger and bigger and/or produces offsets, or daughters. You can leave these new bulbs attached and let them mature and bloom. You may have to accommodate them with a bigger pot at some point.

Or, you can carefully unearth the whole mass and break off the daughters and repot them separately, to give away or keep. The Amaryllis Man soaks his bulbs, leaves and roots in a fungicide for 10 minutes before planting, but I haven’t found that necessary.

See the Amaryllis Man for how to force daughter bulbs to develop by “chipping,” https://www.youtube.com/watch?v=LAoIelfGWdg.

2017-12amaryllis w stylus pollination-ready Barb Gorges

Each amaryllis flower has six anthers and a stylus. Pollination happens when the pollen on the anthers starts dusting everything and the tip of the stylus opens. Photo by Barb Gorges.


Seedlings

I found growing amaryllis from seed is surprisingly easy, although it can take four years to get blooms.

First, make sure the flowers get pollinated. I had one plant flower in the summer outside where some insects did the job. I’ve also had indoor plants pollinate themselves or I can help them.

Amaryllis flowers make an excellent demonstration of plant reproduction. There are 6 yellow pollen-tipped anthers. You’ll know when the pollen is ripe because it starts dusting everything. At that moment, the end of the single stylus should be open. You can dab pollen on the end of it.

2017-12amaryllisseeds-BarbGorges
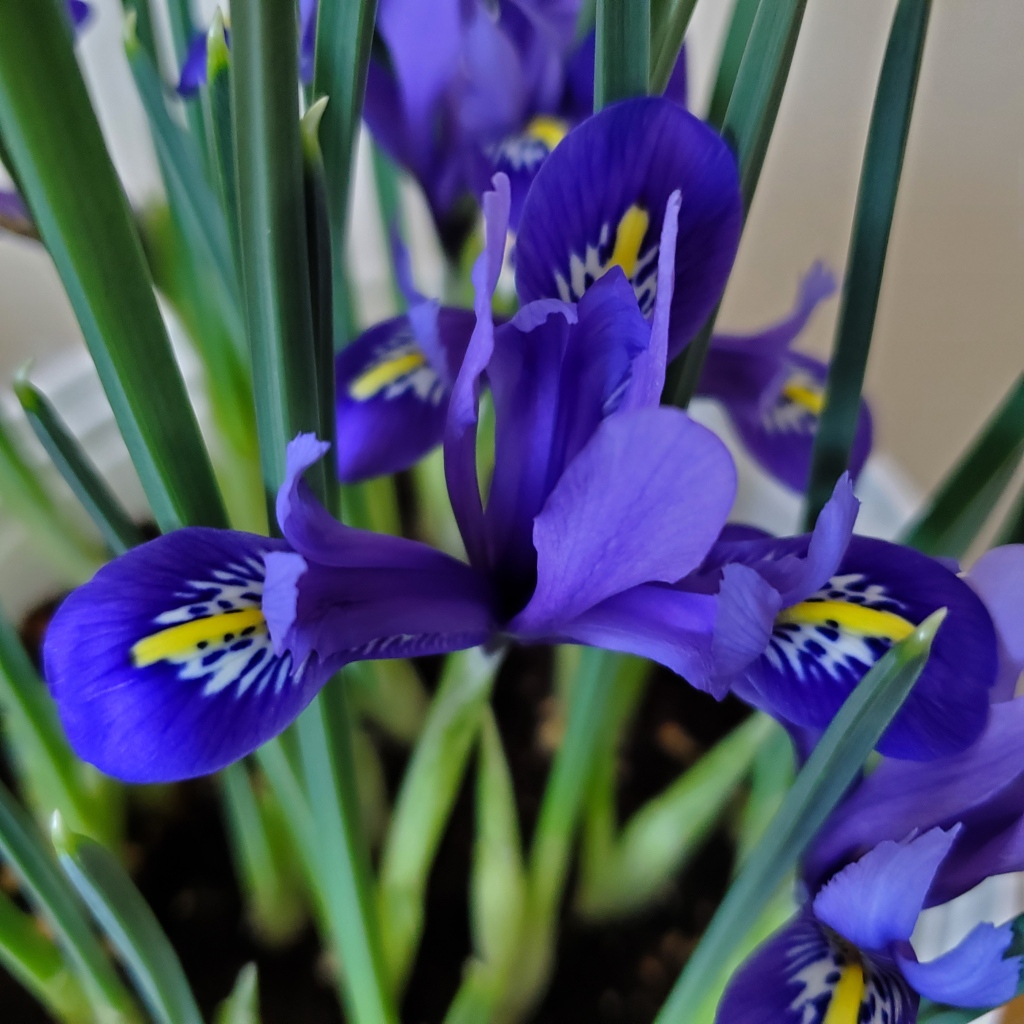
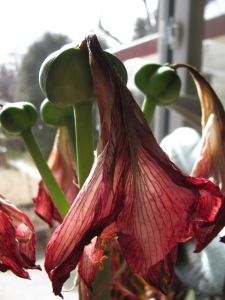
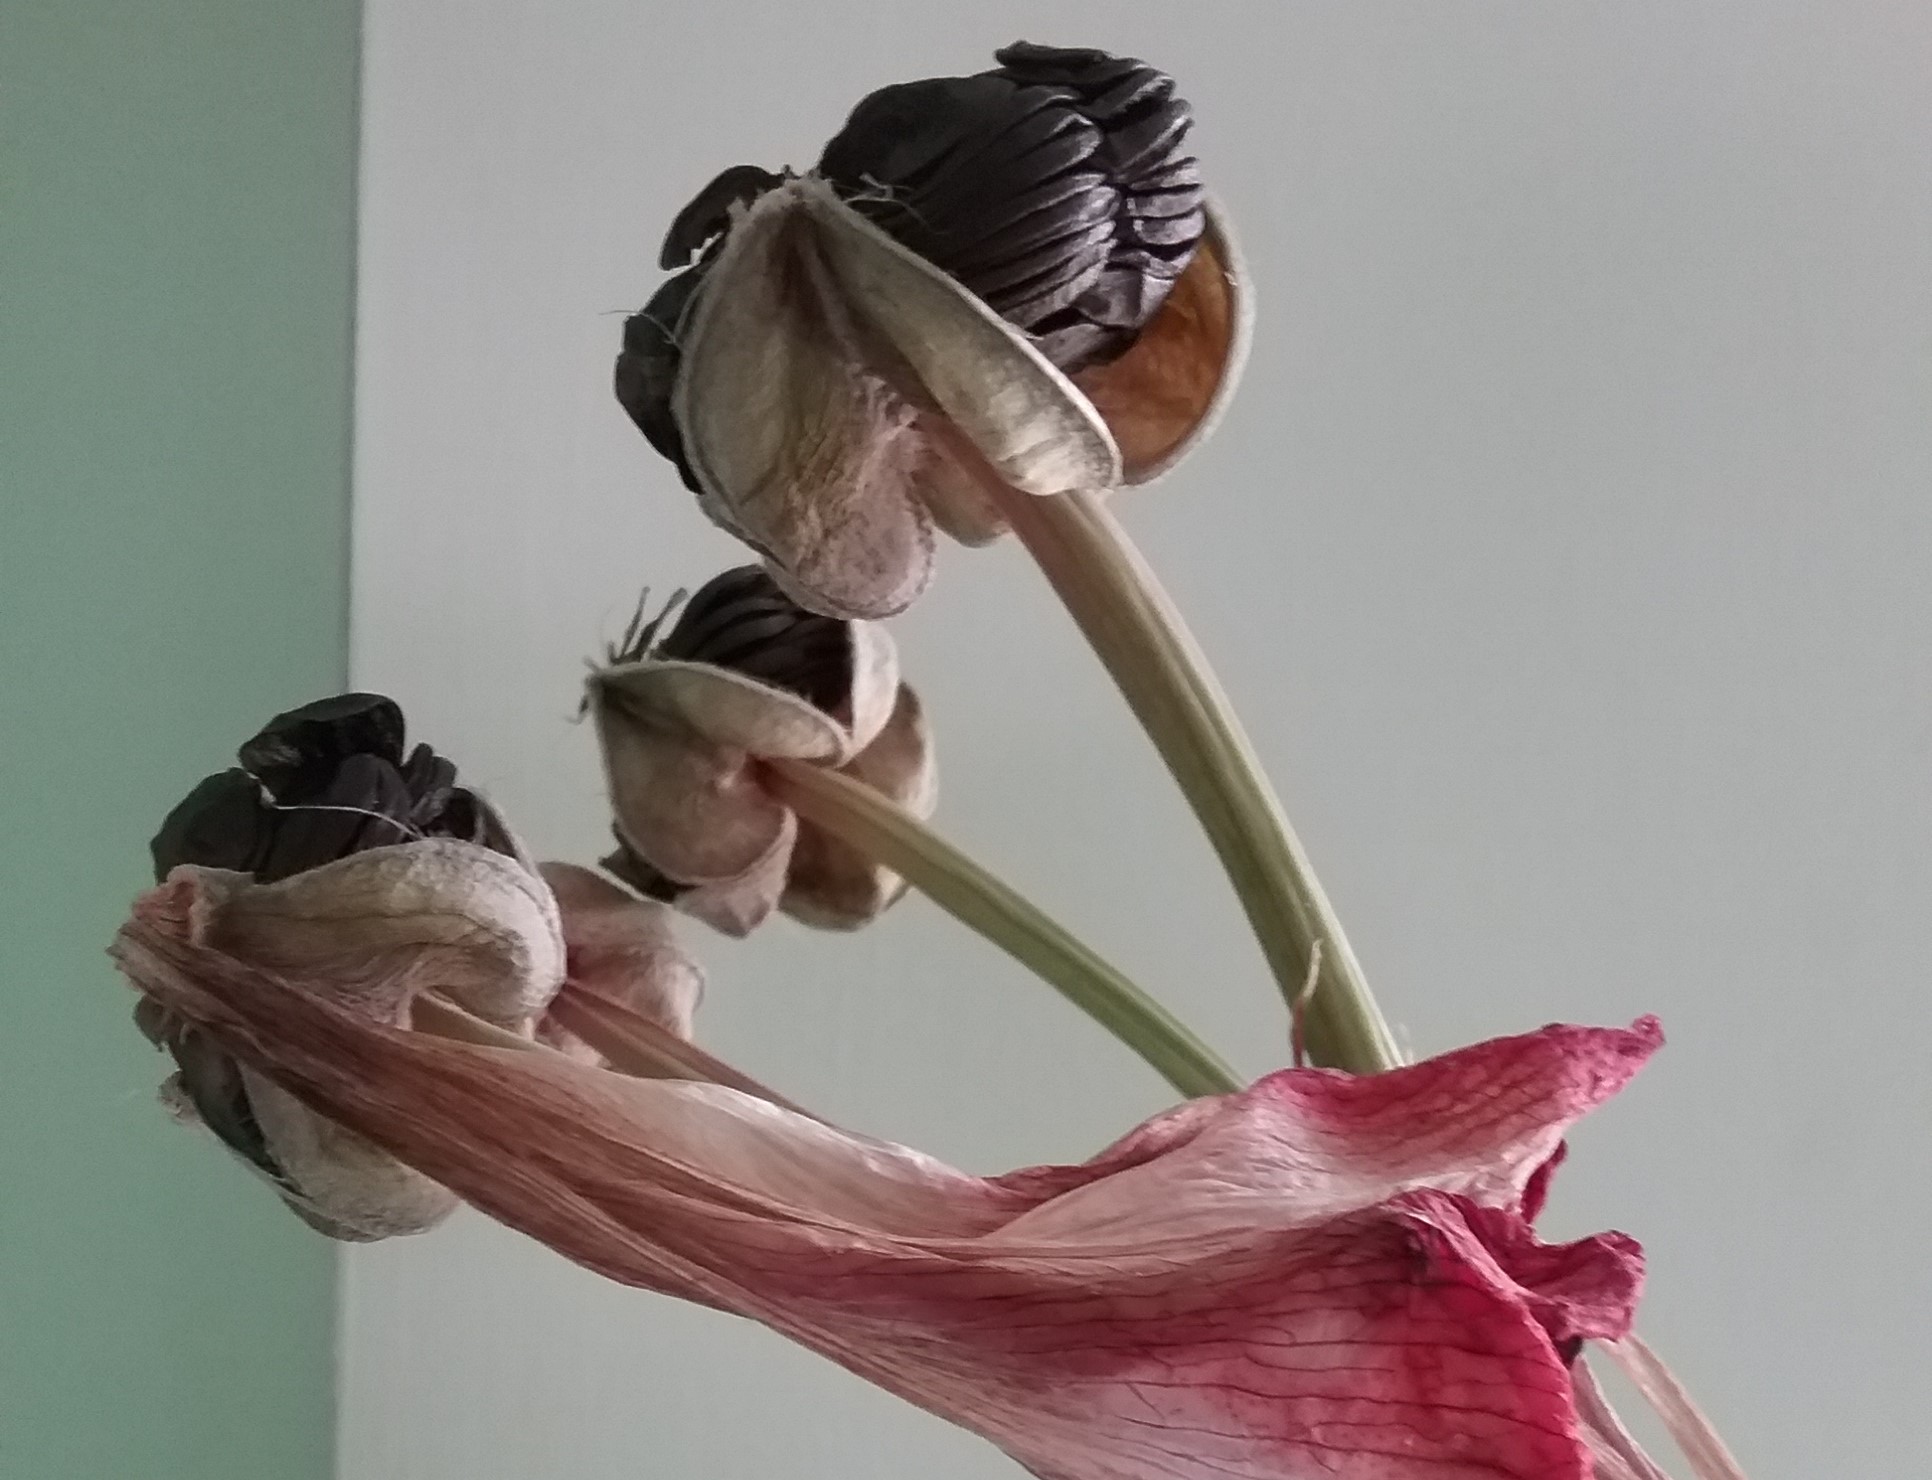
If you are successful, the ovary will begin to swell right behind the flower petals. A three-lobed pod will develop. Leave it on the flower stem. When it turns brown, it will split open and you can collect the seeds.

Each tiny seed is encased in a flat black wafer. You can give the wafers a couple weeks to cure. Their germination rate will be highest if you sprout them right after that.

2017-12amaryllis seedlings Barb Gorges

The wafer-like seeds of the amaryllis can be floated on water until they sprout in three or four weeks and can be transplanted into soil. Photo by Barb Gorges.

While you can start these seeds as you would flower or vegetable seeds, in a flat of a seed-starting medium like a perlite-peat mix kept moist, I found it more fun and easier (no constant checking soil moisture) to float the seeds on water. After three or four weeks, they sprout tiny leaves and roots with the tiniest bulge of the future bulb. Once they are big enough to grab, you can transplant them as you would any seedling.

But now comes the hard part, waiting for the seedlings to grow up. The Amaryllis Man says some will bloom as early as three years old, but usually it’s four.

Sigh.

That means I have two or three more years before I find out if the cross pollination of my red and pink varieties will yield anything interesting.

2017-12amaryllis seedlings planted Barb Gorges

The amaryllis seedlings on the left are about a year old. The seedlings on the right are newly transplanted after sprouting in water. Photo by Barb Gorges.

Where to buy

If you don’t have any amaryllis yet, it isn’t too late to find them at stores and in catalogs. If you plant a bulb in January, it will bloom at its natural blooming time in early spring.

You may find bulbs marked down at our local garden centers and grocery stores now. Catalogs like Jackson and Perkins or Breck’s offer more variety. And then there’s the Amaryllis Man’s website, http://stores.ebay.com/amaryllisman. If you don’t need your amaryllis in variations of Christmas red and white, he offers some that are orange.

Hmm.

I might have room on my windowsill for one of those if I find another home for my rubber tree….

2018-03-01AmaryllisSeedPodsbyBarbGorges
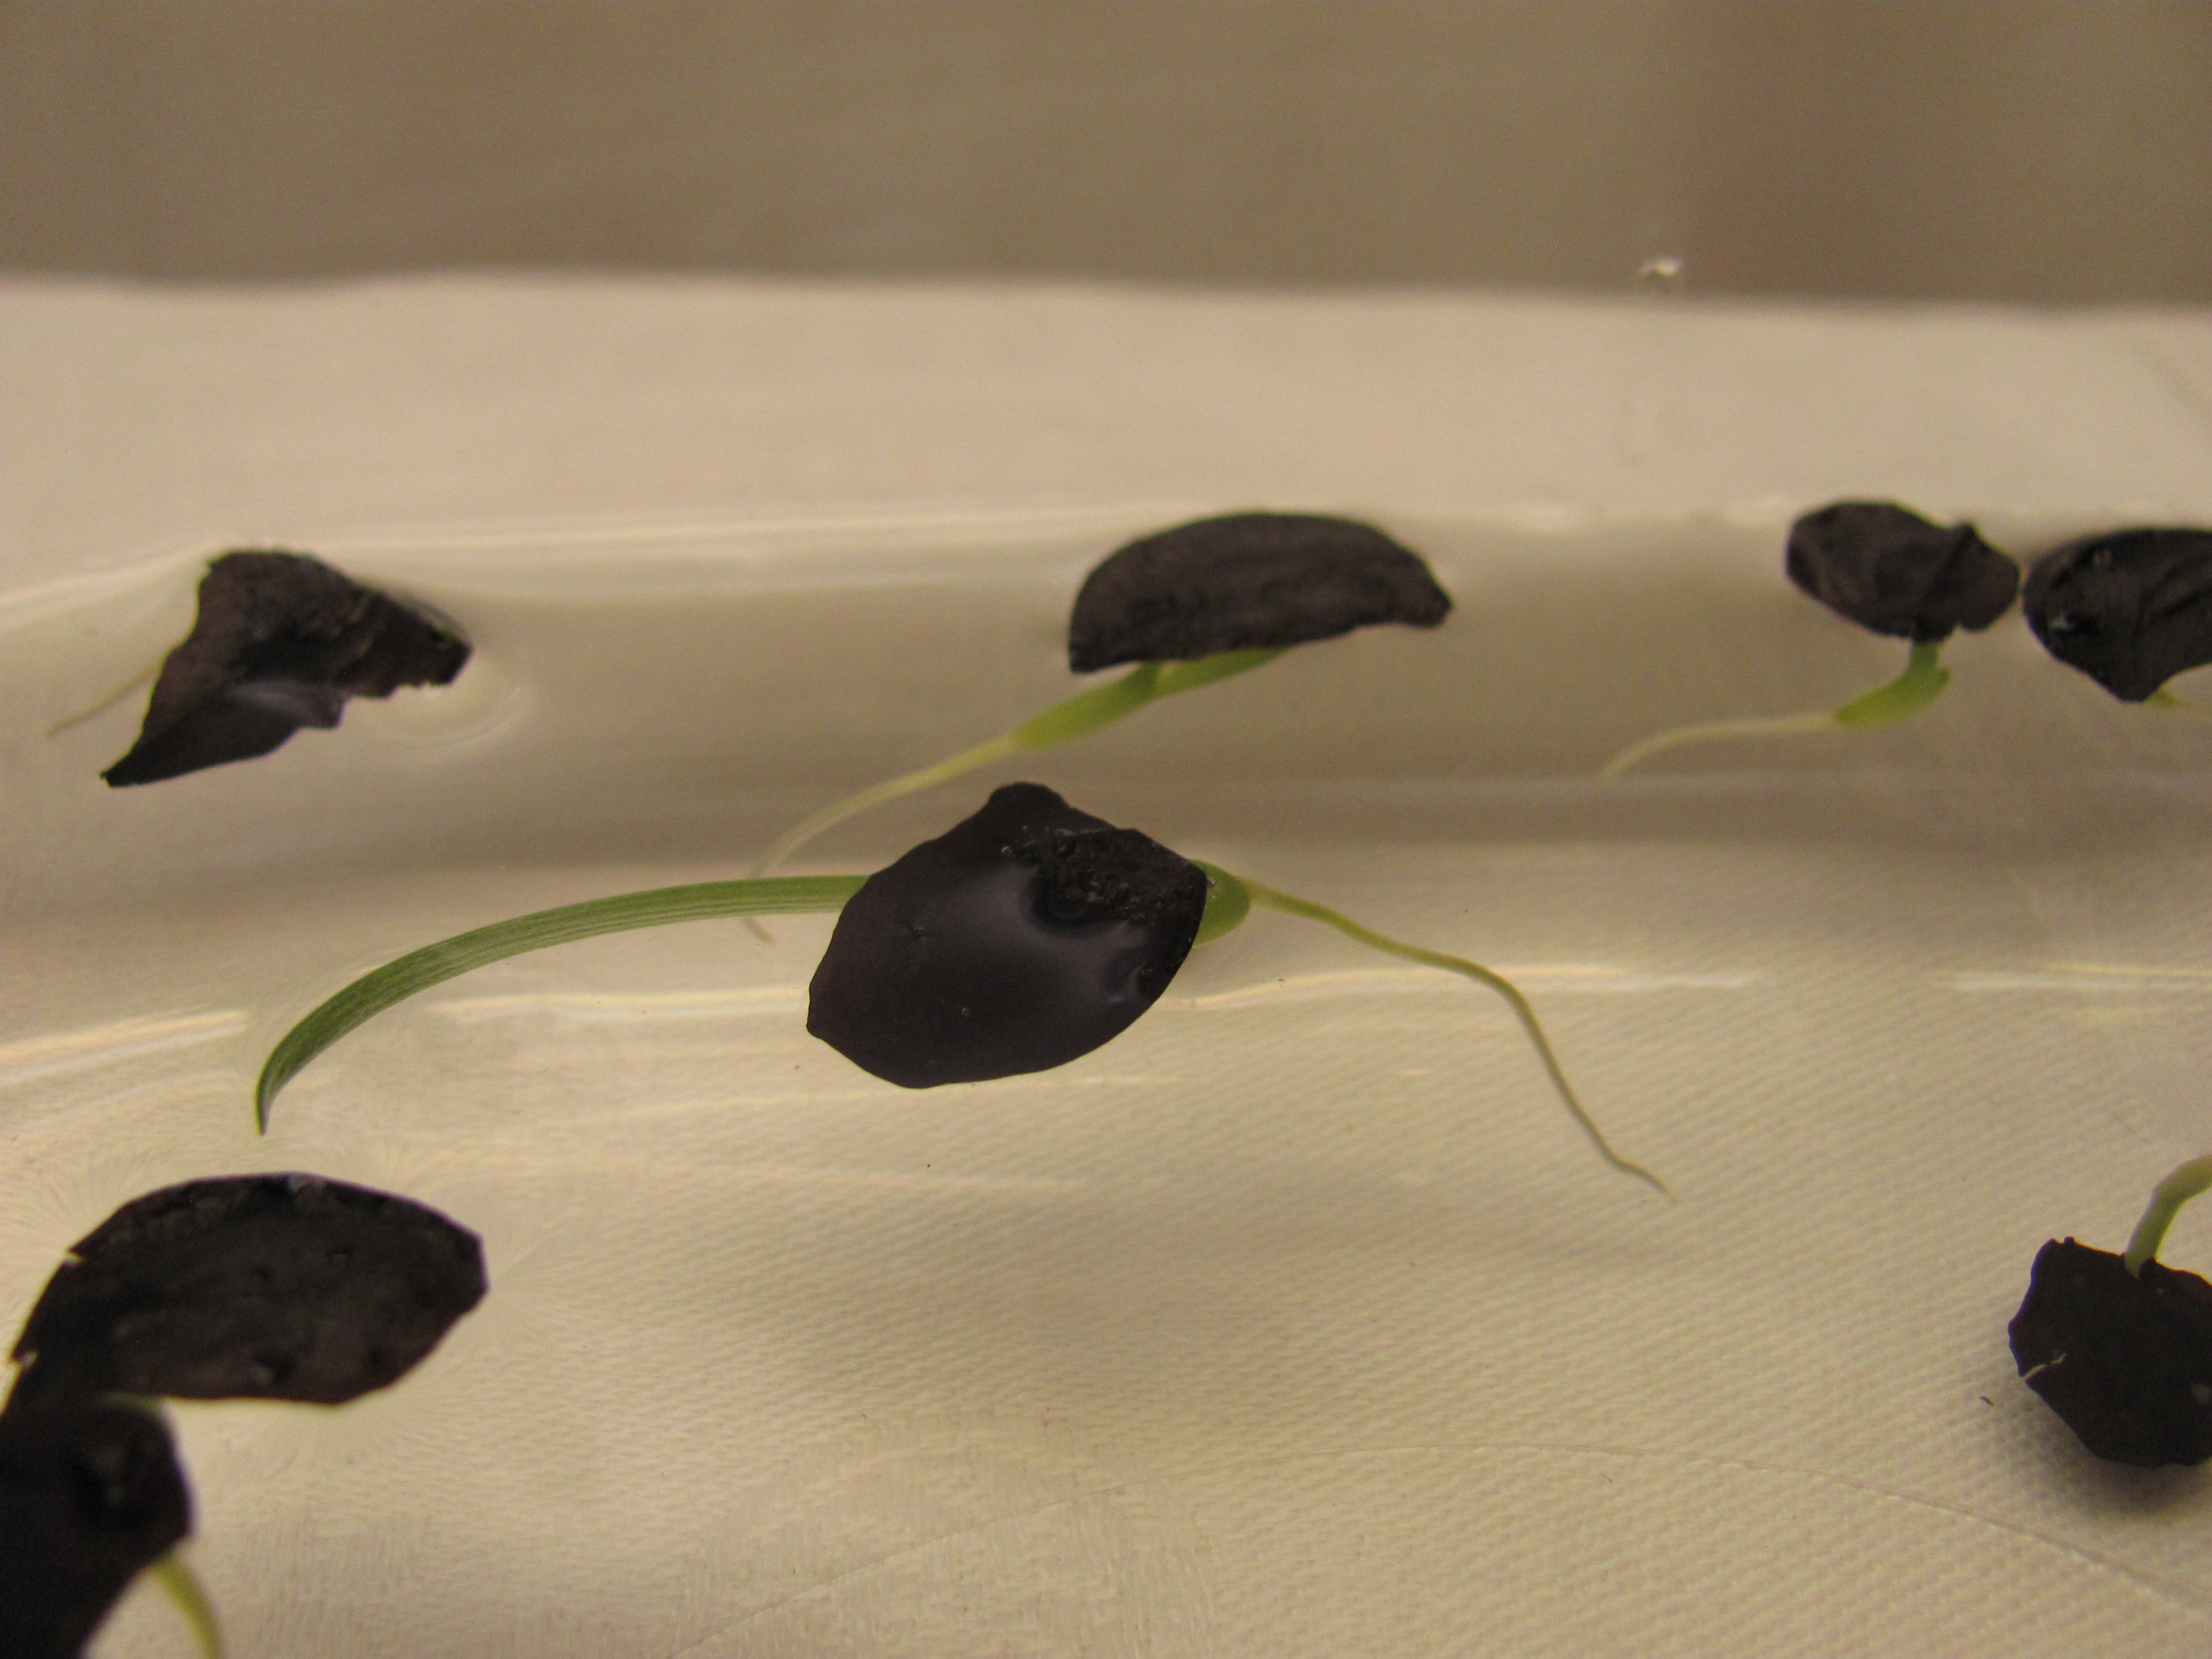
Update, March 1, 2018:

Typically, my amaryllis bloom in February or March. This year they started blooming in mid-January. Only one decided to hold out until the end of February. Just before the petals of one of the early bloomers started to wilt, I touched the anthers to the pistil and now the seed pods are swelling.


Winter sowing


Winter sown seeds 3 - Michelle Bohanan - by Barb Gorges

Laramie County Master Gardener Michelle Bohanan displays one of the milk jugs she uses for winter sowing.

Published Mar. 6, 2016, Wyoming Tribune Eagle, “Winter sowing starts garden at perfect time.”

By Barb Gorges

When I asked her for tips on starting perennial seeds this spring, Laramie County master gardener Michelle Bohanan said, “winter sowing.” I soon discovered it is an increasingly popular concept and practice.

Winter sowing is what our native and other temperate zone plants do naturally. After they set seed, the flowers and fruits dry. Within months or years, they either shatter and release the seeds, a messy bird picks at them, or the wind blows them. You might shred a few dried flower heads yourself from time to time.

The seeds eventually come in contact with the ground where they are subjected to moisture and cold. That, and the cycles of freezing and thawing, eventually break the seed coat which is necessary if it is tougher than the strength of the seedling.

Surprisingly, many seeds require light to germinate. Day length, or cumulative solar warmth, tells them when it is safe to sprout.

With our occasional spring snowstorms, it’s good that not all seeds, even of the same variety or species, require the same exact amount of light and heat. If the first up are frozen out, the slower germinating fill in behind.

Of course, the plants that have winter sowing down to a fine art are the weeds.

The problem with merely sprinkling seed over your flower bed is that seed is expensive and you don’t know how hungry your local birds and mice are going to be.

It occurred to New York state gardener Trudi Davidoff to safeguard her winter sowing by seeding in shallow, covered containers she set out in her garden. In spring, there was no need to harden off the seedlings since they were already acclimated to the outdoors. She merely transferred them into her garden. Another benefit? No need for grow lights or heat mats. She’s been spreading the word since.


Winter sown seeds 1 by Barb Gorges

Cut the milk jug just below the handle, forming a pot 4 inches deep, and a separate cover. Photo by Barb Gorges.

How to winter sow


I visited Bohanan on a nasty day in January with half a foot of snow on the ground. I brought along a translucent plastic gallon milk jug and a little packet of alpine aster seed I’d received in a seed exchange.

With a pair of heavy-duty scissors, Bohanan punctured the jug just below the handle and cut all the way around, creating a 4-inch high pot and a separate cover. She put in about 3 inches of her favorite commercial potting soil, already moistened.

Next, she spilled a couple dozen seeds onto a plastic container lid and with a toothpick, sorted through them, kicking out any unfertilized seeds. They look lighter because they don’t have the germ of the seed needed for germination.

Winter sown seeds 2 by Barb Gorges

Seeds that require light to germinate are placed touching the surface of the potting soil. Photo by Barb Gorges.

Like many small seeds, these require light, so Bohanan gently pressed 16 into the soil but didn’t bury them. Then she forced the upper half of the milk jug, upright, into the bottom half to protect the seeds, leaving off the jug’s cap.


In other, wetter climates, the top and bottom can be slashed to allow snow and rain to water the seeds and then drain, but in our drier climate, Bohanan has had, over seven years, good results without making additional openings.

However, I found I had to puncture the bottoms after the snow on top of my jugs began to melt.

On the Internet, a search for “winter sowing” shows many kinds of recycled containers. The bottom needs to be at least 3 inches deep for the soil and the top needs to clear the soil surface by at least 2 inches. The top also needs to be clear or translucent. You provide adequate ventilation and drainage openings as needed.

On the jug in permanent marker Bohanan wrote the name, source and number of seeds and the date of planting.

Winter sown seeds 4 by Barb Gorges

The planted milk jugs can be safely left out in the cold and snow. The seeds will sprout in the spring. Photo by Barb Gorges.

Back at home, I put the milk jug in a snowdrift on the northeast side of our back fence. While I wait for spring, I’ll empty more milk jugs and try planting more seeds.


Bohanan already had 35 jugs going and figured she was only 25 percent of the way through her winter sowing plans.

This technique is easier than my experience last year sprouting orange butterfly weed—a type of milkweed. I had to leave the seeds, planted in moist potting soil and covered with plastic, in my refrigerator for 6 weeks to achieve “stratification,” the term for this cold treatment.  Other seeds need scarification, scratching a break in the seed coat, and this winter sowing method can help.

Maintenance

While seeds left lying on the ground require no help from us, ones in containers do.

Bohanan’s milk jugs have the opening at the top, plus the gaps where the upper part of the jug is pressed into the bottom, that allow for some snow and rain to seep in and some heat to escape when it warms up in the spring. She forgoes slits in the bottom because she puts some jugs in her unheated sunroom and would rather not have them leak on the floor.

However, she does check her jugs regularly to make sure they don’t dry out, especially the ones under cover of her hoop house. She can tell by the lighter color of the soil (although this doesn’t work for all potting soils), or she can lift the jug and tell by the weight if it needs watering.

Knowing how much water to add might be a trick, and if you think you might be prone to overwatering, you should probably add bottom drainage openings.

When the weather gets warm, to keep seedlings from baking, it is necessary to pull the top off and prop it on the bottom diagonally or even remove it entirely during the day.

Timing and location

All of this still sounds easier and cheaper than setting up lights or buying starts next spring. With our last frost nearly three months away, there is enough time to accommodate even seeds that need 8 weeks of cold.

But figuring out where to put your jugs is also important. Placed along the south-facing wall of your house may cause some seedlings to sprout too soon. Along a north-facing wall may delay them. But the mini-greenhouses are easy to move. Just experiment.

What to grow

Try native perennials from our northern temperate climate, Zone 5 or colder, especially if you are turning your lawn into bird, butterfly and bee-friendly habitat. Popular flowers include varieties of penstemon, coreopsis, milkweed and gaillardia.

Try cold-tolerant vegetables from the cabbage family, herbs and flowering annuals, but probably not slow-starting annuals like petunias. It would take all summer for them to finally bloom.

The seeds of tropical plants, like tomatoes, eggplants and peppers, may also get started too late to produce before first fall frost. Instead, see tomato growing advice archived at www.CheyenneGardenGossip.wordpress.com.

Resources

Winter Sown, www.wintersown.org: Trudi Davidoff’s site.

Dave’s Garden, http://davesgarden.com/guides/pf/ws: Gardeners all over the country have recorded their success winter sowing a variety of plants, but be aware of what zone they report from.

Alplains, http://www.alplains.com/: This catalog specializes in native plant seeds and has essential propagation information. However, use the following website to translate the Latin names.

The Missouri Botanic Garden’s Plant Finder, http://www.missouribotanicalgarden.org/plantfinder/: This is one of Bohanan’s favorite sources of information.

Typical native perennials for the Cheyenne, Wyoming area: Blanketflower, Gaillardia spp.; Gayfeather, Liatris punctata; Tickseed, Coreopsis spp.; Beardtongue, Penstemon spp.; Black-eyed Susan, Rudbeckia spp. All photos by Barb Gorges.


7 Seed Starting Secrets


Seed starting aids

Seed starting aids, photo by Barb Gorges

Published Feb. 16, 2014 in the Wyoming Tribune Eagle, “7 seeds of knowledge: It might be cold outside, but now is actually a great time to start your garden by planting seeds indoors. Here are some helpful tips.”

By Barb Gorge

Why start seeds?

“It is so much fun to grow your own stuff,” said Barb Sahl, who teaches Laramie County Master Gardener classes.

Plus, you can grow varieties that may not be available at local nurseries. Best of all, you can time their growth so that they are the optimum size for transplanting to the garden.

Yes, even though it looks a lot like winter, now is actually a great time to start your garden.

Step 1 – Read the seed packet

Get seeds that are in packages dated for this season. The older the seeds, the less likely they will germinate.

Look for short-season vegetables so you can harvest before frost.

The “Silvery Fir Tree” tomato that I tried last year is supposed to produce a ripe tomato in 58 days after transplanting outdoors.

Most vegetables have short-season varieties available, even eggplant. “Orient Express” is rated for 58 days to maturity, and “Marketmore,” a cucumber rated for 60 days.

Cheyenne native Willi Galloway, author of “Grow Cook Eat,” recommends 75 days for our area.

Check to see if seeds are better directly seeded in the garden—some don’t transplant well.

Look for how many weeks before the last frost you should start seeds indoors. Our average last frost date is May 24.

The packets will also tell you proper planting depth. For tiny seeds, it is so scant, place them on the soil surface, sprinkling a little dry soil on top and moistening with a mister.

Check to see if your seeds need special handling. To germinate, some need soaking or nicking or exposure to direct light or to sit in darkness. Some even need to cool in the refrigerator.

Seed-starting medium

Seed-starting medium, photo by Barb Gorges

Step 2—Use seed starting soil

Kathy Shreve, another Master Gardener mentor, is adamant about buying special soil designed for starting seeds. It’s available in most places selling gardening supplies. You will have a higher rate of success because it’s sterile—it doesn’t carry fungus that can kill seedlings, and it’s lightweight so the seeds don’t have to struggle through the heaviness of typical garden soil.

I don’t need a lot of this special mix. Once the seedlings have several true leaves, not just those first two “seed leaves,” I can move them into larger pots with regular, cheaper, potting soil.

Because the seed starter soil is super-dry, be sure to mix it with water before filling the pots.

Accelerated Propagation System

Lee Valley’s “Accelerated Propagation System,” photo by Barb Gorges


APS

“Accelerated Propagation System,” showing water reservoir and wicking system, photo by Barb Gorges

Step 3—Use sterile pots

Kathy and Barb both swear by “accelerated propagation systems.” There are several brands, but the one we use is from www.LeeValley.com. The clear plastic dome keeps the soil surface moist until the seeds sprout.

But the water reservoir is key. A wicking system waters each cell from below so that seeds are never jostled from top watering. And before seeds sprout, the reservoir may not need filling for several days, letting you take a vacation before the more demanding part of plant parenthood begins.

Because the seedlings require only a few weeks before they need repotting, I have been able to start all my small seeds in shifts in this watering system, which is the size of an egg carton. More robust seed varieties do well in other containers covered with plastic wrap until they sprout.

I scavenge for my other containers, carefully reusing plastic pots from plant sales and nursery purchases, as well as whatever stores throw out. It’s appalling how much plastic waste the horticultural industry produces.

Any container you can sanitize can be reused—styrofoam cups, tall drink cups (especially for tomatoes), yogurt cups—just be sure to poke a lot of holes in the bottom for drainage. Clean them and then soak them in a 10 percent bleach solution for a few minutes, then rinse.

There are pots made from compressed fibers of various kinds. The idea is that you can plant the pot and all right into the garden and the roots will grow right through the walls. My experience is that the roots stay in the pot. It is better to tear it away when transplanting and throw the pot in the compost pile.

PotMaker

PotMaker makes pots from newspapers, photo by Barb Gorges

Last year I tried the “PotMaker,” a little wooden cylinder that you roll a strip of newspaper around several times, fold the bottom inch or so underneath and crimp the fold. Remove it from the cylinder and fill it with potting soil. If handled carefully, or rather not handled after setting in a plastic tray, these little pots will hold up until the plant is ready for transplanting outdoors. While newspaper is degradable, I prefer to remove it, if there aren’t too many roots already growing through it.

You could use any cylindrical object to make the size pot of your choice. Wrap the paper around two to three times, but not so tightly you can’t slip it off. And use a freshly read newspaper—nothing that’s been sitting out for weeks accumulating disease spores.

heat mat

Heat mats provide heat under a flat of seedlings, photo by Barb Gorges

Step 4—Provide bottom heat

Some types of seeds, such as vegetables of tropical origin such as tomatoes, peppers and eggplants, are happier with warmth from an electric heat mat placed beneath them. Vegetables from cold climates, like cabbage and broccoli, don’t care so much. Yes, this is an investment, but especially necessary if you are starting your seeds in a chilly basement.

Last year, I dispensed with the heat mat when I decided to start my seeds in the hall bathroom instead of the basement. It has no windows, just a skylight, and is the warmest spot in the house—over 65 degrees. No one uses the bathtub now so I put in freestanding shelves and hung up lights.

Step 5—Provide extra light

“A windowsill is hardly ever sufficient to grow good stocky seedlings,” said Kathy.

Catalogs are happy to sell you special grow lights, but for the brief time seedlings are with you, a 4-foot shoplight with two fluorescent bulbs, 5000-6500 degrees Kelvin (daylight is approximately 5,600 degrees), is adequate for two standard 10-by-20-inch flats.

Turn on the lights when you get up in the morning, and turn them off at bedtime.

Keep the top of the plants about 1 to 2 inches from the light bulbs. Either hang the lights on chains so that their height can be adjusted, or stack stuff under the flats to bring them close to the lights.

Step 6—Provide wind

Really! Both Barb and Kathy keep small, ordinary oscillating fans going across the room from their seedlings. It prevents damping off disease, when seedlings keel over and die.

Also, plants respond to air movement by reinforcing the strength of their stems so you’ll have stockier, stronger plants.

This has worked for me when I started seeds two years ago. Last year, in the bathroom, I didn’t use a fan and didn’t lose any plants. However, Kathy and Barb’s plants did look better than mine.

Step 7—Water and fertilize carefully

More indoor plants are lost to overwatering than anything else. Once your seedlings germinate, take off any plastic covers and make sure the surface of the soil gets a bit dry before the next watering. As the seedlings grow, their watering schedule will change. Plan to check them at least every day.

Most seed-starting and regular potting soils have fertilizer added, so let the little plants chew on that a few weeks before giving them anything more—and then figure half strength of whatever the directions recommend.

Success!

Don’t worry if by the end of May your plants aren’t blooming and as mature-looking as the ones at the store. Blooming plants sell better, but often their roots are pot-bound in those tiny containers and the plants, especially flowers, may not really recover to grow much the rest of the summer.

You can make sure your starts aren’t pot-bound and are at just the right stage to jump into the garden and keep growing.